Your Tech Story

MAC

How to Find Your Apple ID on iPhone, iPad, or Mac?

How to Find Your Apple ID on iPhone, iPad, or Mac?

Apple ID is the gateway to access Apple services and sync your devices. This article guides you how to find your Apple ID on various Apple devices including iPhone, iPad, and Mac.

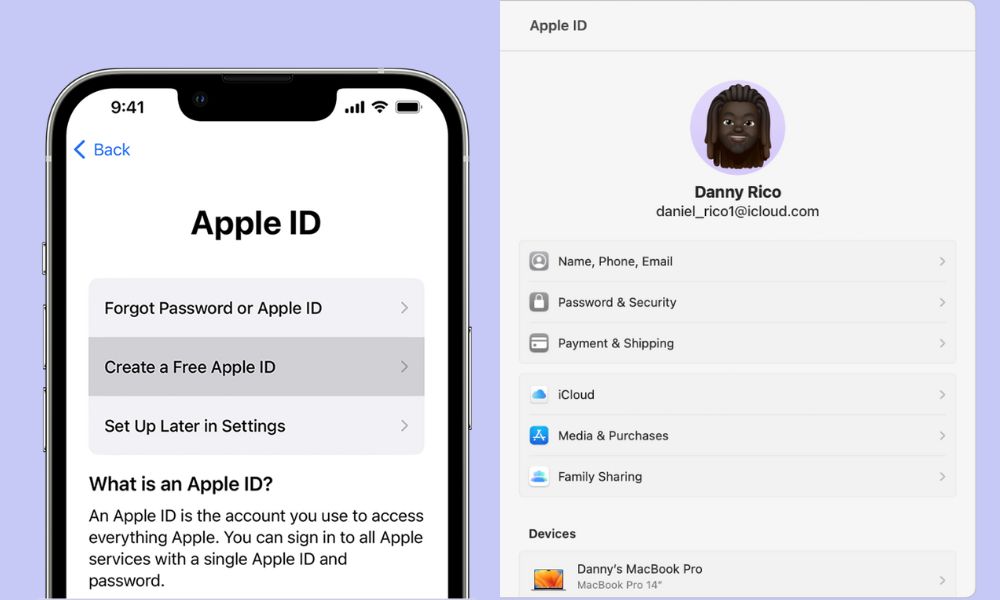
What is an Apple ID?

How to Find Your Apple ID on iPhone, iPad, or Mac?

Image Source: technowize.com

Apple ID is your account to access Apple services like App Store, iCloud, iMessage, FaceTime, and others. This usually includes your email address and a password.

Finding Your Apple ID on iPhone

Finding your Apple ID on your iPhone is a straightforward process. Here are some simple steps to help you locate your Apple ID:

  1. Open Settings: Unlock your iPhone and tap on the ‘Settings’ app. The icon usually looks like a gear and is typically located on your home screen.

  2. Access Your Profile: At the top of the Settings menu, you will see your name along with a photo if you have set one up. This is your Apple ID profile. Tap on it.

  3. View Your Apple ID: Once you tap on your profile, the next screen will display your name and other details. At the top of this screen, you will see your Apple ID. It is usually an email address.

  4. Additional Apple ID Information: On this screen, you can also see other information linked to your Apple ID, such as iCloud, iTunes & App Store, and more. Tapping on these will provide you with more details about your account and services associated with your Apple ID.

Finding Your Apple ID on iPad

Accessing your Apple ID on an iPad is a simple process. Here’s how you can do it:

  1. Open Settings: Start by tapping the ‘Settings’ icon on your iPad. This icon typically looks like a gear and is usually found on the home screen.

  2. Tap on Your Profile: At the very top of the Settings menu, you’ll see your name and, possibly, a photo if you’ve added one. This section is your Apple ID profile. Tap on it to access your Apple ID information.

  3. View Apple ID Details: After tapping on your profile, you will be taken to a screen displaying your name and other personal details. Right at the top, you will find your Apple ID, which is usually your email address.

  4. Manage Your Apple ID: If you wish to change settings related to your Apple ID, such as updating your password, modifying payment information, or adjusting your privacy settings, you can do so from this screen.

Finding Your Apple ID on Mac

Locating your Apple ID on a Mac is a simple and quick process. Follow these steps to find it:

  1. Click on the Apple Menu: Begin by clicking on the Apple logo located at the top left corner of your Mac’s screen. This will open a drop-down menu.

  2. Select ‘System Preferences’: From the drop-down menu, choose ‘System Preferences’. This option is usually the second one in the list.

  3. Open Apple ID Settings: In the ‘System Preferences’ window, look for the ‘Apple ID’ option. It’s typically located near the top right corner. Click on it.

  4. View Your Apple ID: Once you click on ‘Apple ID’, a new window will open showing your Apple ID details. Your Apple ID, which is usually your email address, will be displayed at the top of this window.

Securing Your Apple ID

Securing your Apple ID is essential to protect your personal data and access to various Apple services. Key measures include creating a strong, unique password, enabling two-factor authentication, and being vigilant about phishing attempts. Regularly changing your password, updating security questions, and monitoring connected devices also enhance security. It’s important to avoid sharing your Apple ID credentials and to use trusted devices for logging in. By taking these steps, you can significantly reduce the risk of unauthorized access and ensure the safety of your digital Apple ecosystem.

Conclusion

Your Apple ID is a crucial part of your experience with Apple devices and services. Knowing how to find and manage it ensures seamless use of Apple’s ecosystem.

macOS

How to install the macOS Sonoma public beta?

Apple regularly releases beta versions of its operating systems to allow users to test new features and provide feedback before the official release. If you’re eager to try out the latest macOS Sonoma public beta, follow these steps to install it on your Mac. However, keep in mind that beta software may contain bugs and compatibility issues, so it’s advisable to back up your data before proceeding.

Before installing any beta software, it’s crucial to create a backup of your data using Time Machine. This ensures that you can revert to a stable version if any issues arise during the beta installation process.

macOS
Image Source: 9to5mac.com

Ensure that you have approximately 20GB of free space on your storage drive before attempting to install the beta. This ensures that you have enough room for the installation process.

Open Safari and navigate to Apple’s beta software portal. If you haven’t previously installed a public beta, you’ll need to sign up for access using your Apple ID. If you have already enrolled, click “Enroll Your Devices” in the top-right corner of the webpage. On the beta software portal, click on the macOS option, which is located in the center of the page.

Also Read: What is Netflix’s new ‘Profile Transfer” feature?

Scroll down the page until you find a button that says “Download the macOS Public Beta Access Utility.” Click on it to download a .DMG file. Once the download is complete, run the .PKG file within the disk image to sign up for receiving beta updates. After launching the installer, it will check for a Time Machine backup. If no backup is detected, a prompt will appear reminding you to perform a backup before proceeding.

Once you have completed the above steps, open the System Preferences app and navigate to Software Update. If it doesn’t open automatically, manually open it.

If you’re enrolled in the beta program, you should see a message stating, “This Mac is enrolled in the Apple Beta Software Program” below the Software Update icon. Note that the download may not be immediately available, and you’ll receive a notification once it is ready.

The updated file will take some time to download. Once the download is complete, click on “Upgrade Now” and follow the on-screen instructions to install the macOS Sonoma public beta on your Mac.

Remember, beta software is still in development, and unexpected issues may arise. It’s advisable to install the beta on a secondary machine or create a separate partition on your primary machine to keep your stable macOS installation unaffected. This allows you to test the new features without compromising your daily workflow.

By following these steps, you’ll be able to install the macOS Sonoma public beta and explore the latest features and improvements Apple has to offer. Enjoy testing the beta and providing valuable feedback to contribute to the development process!

outlook

Microsoft makes Outlook for Mac free. How to get it?

Microsoft declared that all Mac users can now download Outlook for free. Previously, using the email client application required a Microsoft 365 subscription.

Mac users can easily add Outlook.com, Gmail, iCloud, Yahoo!, or IMAP accounts in Outlook to enjoy the best mail and calendar app on macOS whether they are at home, at work, or in school.

MIcrosoft
Image Source: engadget.com

The Outlook for Mac application completes Outlook for iOS, offering users a dependable, powerful, and consistent experience that extends Outlook’s best-in-class functionality into the beloved Apple environment.

Also Read: How to Add Bing ChatGPT in Skype?

Users can handle numerous accounts, including those from Google, iCloud, Microsoft, Yahoo, IMAP, and more, in a single app with Microsoft Outlook for Mac. Using a personal email account to sign into Outlook gives users access to “enterprise-grade security, with secure sign-on to authenticate and protect your identity,” according to a blog post.

The app has a straightforward user interface, and it lets one view their calendar with an alert or a widget in the Notification Center to keep track of their schedule while using other apps.

Users can resume tasks where they left off between iOS and Mac devices using Apple’s Handoff feature. Microsoft Outlook will introduce Profiles in a later upgrade, linking users’ email accounts to Apple’s Focus experience.

With that, users won’t receive unnecessary alerts at the wrong moment, allowing them to concentrate on that crucial work email without getting sidetracked by personal emails.

The all-accounts view allows users who have multiple accounts to handle all of their inboxes simultaneously without switching between screens. This, according to Microsoft, is a fantastic method to view all incoming messages so you can decide how to respond.

Users can obtain the updated, revamped, free version of Outlook for Mac by downloading it from the Mac App Store. To use the free app, your Mac must run macOS 11 Big Sur or a later version. Expect snappier performance and quicker sync rates with this upgraded version of Outlook because it is optimized for Apple Silicon.

Microsoft made the decision to offer Outlook for Mac free at the same time that it was redesigning the Outlook for Windows application. For almost a year, Microsoft has been testing a new web-based version of Outlook with the intention of fusing the Windows Mail app and Outlook for Windows into a unified email client.

Also Read: Microsoft set to win EU nod on Activision with licensing offer

In essence, the new “One Outlook” app is Outlook.com as a Progressive Web App (PWA). This new client will handle a number of email providers and be free (like Windows Mail), much the same as Outlook for Mac. The company was clear that no updates to Outlook for Mac to a progressive web app are in the works.

A partner product group manager for Outlook named Michael Palermiti claims that the new Outlook for Mac is a native macOS program. Microsoft intends to keep creating and updating world-class native applications for iOS and macOS. Outlook for Mac won’t have any Progressive Web Apps.

iPhone 15 Pro

Will the iPhone 15 Pro have as much RAM as a MacBook?

Though the iPhone 15 Pro won’t go on sale until almost the end of the year, there is already a lot to report from the global supply chain. The most recent information is provided by Taiwanese supply chain analysis company TrendForce, which asserts that Apple has increased the RAM for the iPhone 15 Pro.

iPhone 15 Pro
Image Source: gizchina.com

The iPhone 15 Pro, according to a recent rumor, will have the same amount of RAM as the base model MacBook Air. TrendForce claims that Apple intends to upgrade ” the capacity and specifications of the DRAM solutions featured in the next generation of the iPhone.”

Also Read: iPhone 15 and 15 Plus to get redesigned camera. What to expect?

Since Apple only recently upped the RAM in the non-Pro iPhones to 6GB, the iPhone 15 Pro is the candidate that will most likely leap to 8GB of RAM. In contrast, the iPhone Pro has had 6GB of Memory since the release of the iPhone 12 in 2020.

The iPhone 15 will most likely have the same A16 CPU as the iPhone 14 Pro, which means that it will most likely receive the same 6GB of LPDDR5 RAM, an improvement over the LPDDR4 RAM in the iPhone 14. The iPhone 15 Pro might also switch to LPDDR5X RAM, which has a higher bandwidth than LPDDR5 RAM.

There have been reports about the iPhone Pro getting 8GB of RAM before, and this is not unusual for smartphones. The base edition of the Galaxy S23 series has 8GB of RAM, and the Ultra variant has 12GB of RAM with greater storage tiers. There is some idea of what the iPhone 15 will include when it launches later this year.

There might be a USB-C port because reports claim that Apple will adopt the new standard starting with the iPhone 15—especially given that the switchover’s target date is 2024. The gadget might have solid-state buttons that function like tiny trackpads. As the buttons are pressed, Apple’s Taptic Engines will provide haptic input.

Also Read: 15-Inch MacBook Air Rumored to Launch in April

In order to attract rugged users, Apple may also give an “ultra” version of the iPhone, similar to how it markets the Apple Watch Ultra. The iPhone 15 Pro will be among the most potent portable devices ever created, along with persistent rumors that Apple will switch to a 3nm process for the A17 chip, which is said to bring the largest speed increase in years.

Online 3D models of the forthcoming 15 Pro Max from tech behemoth Apple have disclosed that the device will have a thicker body and no physical buttons. Ice Universe, a tipster, shared the 3D models in a tweet on Saturday along with the statement, “Compared with 14 Pro Max, the bezel is narrower but thicker.”

Stage Manager

How to Use Stage Manager With iPad and Mac?

The Stage Manager tool by Apple is designed to let users multitask on an iPad or Macbook.

Apple initially stated that Stage Manager would only be compatible with iPad Pro models running the M1 processor and subsequent generations. Later on, though, the company added compatibility for iPad Pro devices with both the A12X and A12Z CPUs.

Stage Manager
Image Source: 360-reader.com

Stage Manager is compatible with the following iPads: 12.9-inch iPad Pro (3rd generation and later), 11-inch iPad Pro (all generations), and iOS Air (5th generation). Only the following models support moving apps and windows via Stage Manager between the iPad and an additional display: 12.9-inch iPad Pro (5th generation and later), 11-inch iPad Pro (3rd generation and later), and iOS Air (5th generation). For Macbook, Stage Manager is compatible with any Mac model running MacOS Ventura. The next step is to confirm that your device is running the most recent version of MacOS or iPadOS.

Also Read: Is it possible to transfer games between PCs and Steam Deck?

No matter if you use Stage Manager on an iPad or a Mac, the interface is the same. The currently open app sits in the center of the display, while a list of recently used apps is located on the left. Based on if you are using a desktop or a tablet, the navigation is different.

When you’re finished using the current app, you can quickly switch to a different one by tapping on it in the Dock or selecting it from the list of recently used apps on the left. The new app will open in the center of the screen whenever you switch, moving the current app to the Recent apps list. The arrangement can also be changed.

To make the active apps appear bigger, you can choose to hide the Recent Apps list or Docks by going to Settings > Home Screen & Multitasking. Always swipe to the right from the left side of the screen to reach the Recent Apps list, and swipe up from the bottom of the screen to access the Dock.

To view more content in your apps, users of the iPad Pro 12.9-inch (5th generation and later), iPad Pro 11-inch (all generations), and iPad Air (5th generation) can raise the pixel density on their devices. These devices support display scaling mode. Click Settings > Display & Brightness > Display Zoom > More Space. Apps can be grouped as well.

The learning slope for using Stage Manager with MacOS Ventura isn’t as high. The four most recent active apps are arranged to the right of the screen as soon as Stage Manager is turned on, with one app taking up the entire screen.

Also Read: What is the new RGB lighting feature in Windows 11?

In the manager, you can navigate to any of the left-side apps by clicking on them or by starting a new application from the Dock. The learning slope for using Stage Manager with MacOS Ventura isn’t as high. The four most recent active apps are arranged to the right of the screen as soon as Stage Manager is turned on, with one app taking up the entire screen.

In the manager, you can navigate to any of the left-side apps by clicking on them or by starting a new application from the Dock.

In order to turn off Stage Manager on your iPad, swipe down to reveal the Control Center and tap the icon. On your Mac, perform the same steps by clicking the Control Center icon and then selecting the Stage Manager icon.

Google One

Google One VPN Service Now Available on Windows and Mac

Google One subscribers who are utilizing the Premium Plan or higher, are granted access to the firm’s own VPN service without any cost.  Up until recently, the service was only available on Android and iOS devices, but Google is now making it available to desktop users as well. This means that if a user purchases a 2TB or higher plan, then VPN by Google One will be added automatically and without any additional charge.

Image Source: 9to5google.com

Google One VPN support has been brought for Mac and Windows devices and it was confirmed by the company. It is now available in 22 countries around the world, enabling the users to mask their IP addresses and restrict trackers.

“We remain committed to a high degree of transparency and verifiability of our privacy and security guarantees. We have recently completed an extension of this audit to cover the desktop implementations for Windows and macOS,” the company was quoted as saying.

Source: business-standard.com

The desktop version necessitates a minimum of macOS Big Sur or Windows 10. The Mac app supports both x86 and ARM users, whereas the Windows app does not support 32-bit or ARM-based systems.

It’s worth noting that, unlike most of the premium VPN services on the market, Google One’s VPN does not permit users to modify their location in order to access or unlock media content from other regions on streaming platforms. The Google One VPN, like Apple’s iCloud Plus VPN, automatically assigns an IP address within the area from which the user connects.

Google’s VPN service is also audited by third-party organizations. To ensure transparency, the firm also showcases the source code for its app libraries. The search engine behemoth has revealed that the desktop app audit will be publicly disclosed in the upcoming week time.

Google began offering their VPN service for free to Google One subscriber having a 2TB plan in the United States in 2020, but the firm has since decided to expand this free offering to 22 marketplaces, including Mexico, Canada, the United Kingdom, France, Germany, Spain, and Italy, among others.