Mercedes-Benz has taken a bold step into the future with the introduction of an electric version of its legendary G-Class SUV. The move is part of the luxury automaker’s broader strategy to adopt electrification across its vehicle lineup. The new electric G-Class, introduced early next year, retains the iconic design and strong functionality of its predecessors while promising zero-emission driving.
Details of the Electric Transformation
Image Source: silanano.com
The electric G-Class is designed to combine traditional Mercedes luxury with cutting-edge electric vehicle technology. According to Mercedes-Benz, the model will offer a seamless transition into the world of electric vehicles (EVs) for G-Class enthusiasts, maintaining the vehicle’s renowned off-road and on-road capabilities, but with an electric twist.
Ongoing Challenges with Battery Technology
While the launch of the electric G-Class has generated a lot of excitement, Mercedes-Benz officials have openly discussed the ongoing challenges in battery technology that still need to be overcome. The automaker is focusing on increasing the efficiency, lifespan, and energy density of batteries, which are critical to improving the range and performance of EVs.
Strategic Partnerships for Battery Development
Mercedes-Benz is not tackling these challenges alone; It has established partnerships with leading technology firms and research institutes to accelerate advances in battery technology. The main goal is to develop next-generation batteries that could potentially revolutionize the electric vehicle market. This includes the exploration of solid-state battery technology, which promises greater safety and energy efficiency than current lithium-ion batteries.
Impact on the Automotive Industry
The introduction of the electric G-Class is seen as an important step by Mercedes-Benz to maintain its competitive edge in the rapidly evolving automotive industry. As more consumers and governments push for sustainable and eco-friendly transportation options, luxury automakers are under increasing pressure to provide attractive electric vehicle offerings.
Looking Forward
Mercedes-Benz plans to start selling the electric G-Class next year, with potential buyers already showing keen interest. As the company continues to refine its battery technologies, it is committed to providing high-performance, luxurious electric vehicles that meet the needs and expectations of its discerning customers. The journey towards improving the EV G-Class continues, and Mercedes-Benz is ready to lead the way in transforming luxury mobility for a sustainable future.
With growing concerns about data privacy and ongoing discussions over a possible ban on TikTok in different countries, many users are looking for ways to save their favorite TikTok videos. Whether you are a content creator who is worried about losing access to their work or a user who enjoys watching and sharing videos, knowing how to download TikTok videos without a watermark can be extremely useful.
Why Remove the Watermark?
Image Source: youtube.com
Removing watermarks from TikTok videos can be important for a few reasons. First, it gives the video a cleaner look, which is important if you’re reusing content for other platforms. Secondly, it helps maintain a more professional appearance when using videos for presentations or portfolios.
Using Third-Party Apps
Several third-party apps allow you to download TikTok videos without the watermark. Here are a few popular ones:
1. SnapTik
How to Use: Simply copy the URL of the TikTok video you wish to download and paste it into SnapTik. The app will process the video and provide a download link without the watermark.
Availability: Available as a web service and as an app for both Android and iOS.
2. MusicallyDown
How to Use: Similar to SnapTik, you copy the video URL from TikTok and paste it into MusicallyDown. The site will then offer a link to download the video sans watermark.
Availability: Accessible through its website.
3. TikTok Video Downloader
How to Use: Use this tool by entering the URL of the video into their website. It provides options to download with or without watermarks.
Availability: Primarily available online via their website.
Desktop Solutions
For those who prefer using a desktop, there are software solutions that can bulk download TikTok videos without watermarks:
1. 4K Video Downloader
How to Use: After installing the software, paste the TikTok video link into the application. Select the quality and format of your download, and make sure to select the option to remove the watermark.
Benefits: Allows downloading playlists and supports multiple formats.
2. YT Saver
How to Use: This software also works by pasting the video URL. YT Saver offers an option to download TikTok videos without the watermark and even convert them to different formats.
Benefits: Supports video conversion to formats like MP4, MP3, and more.
Precautions and Legal Considerations
While it is technically possible to download TikTok videos without watermarks, it is necessary to consider the legal and ethical implications. Always make sure you have the rights to download and use the content, especially if you plan to reuse it for commercial use. Additionally, be cautious when downloading third-party apps and software to avoid malware.
Conclusion
Downloading TikTok videos without watermarks is a useful skill to have, especially in view of the potential restrictions. Whether using web-based tools, apps, or desktop software, there are plenty of options available that suit different needs and preferences. Just remember to download and use content responsibly, respect the rights of the creators, and follow legal guidelines.
Are you considering canceling your Spotify Premium subscription? Whether you want to cut costs, switch to another service, or just don’t use it enough to justify the expense, canceling Spotify Premium is straightforward.
1. Via the Spotify Website
Cancelling your subscription through the Spotify website is perhaps the easiest way. Just follow these steps:
Step-by-Step Instructions:
Log In: Visit the Spotify website and log into your account. You’ll need your username and password. If you usually log in through Facebook or Apple, use those credentials.
Account Overview: Once logged in, navigate to your account page by clicking on your profile name in the top right corner, then select ‘Account’ from the dropdown menu.
Subscription Details: In your account page, click on ‘Subscription’ in the sidebar. Here you’ll see your current subscription status and details.
Change or Cancel: Click on ‘Change or Cancel’ to view your options. Select ‘Cancel Premium.’
Confirm Cancellation: Spotify will likely try to persuade you to stay with various offers. If you’re sure about cancelling, continue and confirm your cancellation.
After these steps, your account will revert to Spotify Free at the end of your current billing cycle.
2. Using the Spotify App
While you can’t cancel directly through the Spotify app on your mobile device, you can use it to access the necessary web page where you can complete the cancellation.
Steps to Navigate:
Open the App: Launch the Spotify app on your mobile device.
Account Settings: Go to ‘Your Library’, tap on the settings gear in the top right corner, and then select ‘Account’.
Subscription Page: This will redirect you to the Spotify subscription page in your web browser, where you can follow the same steps as listed above for the website to cancel your subscription.
3. Contacting Customer Support
If you encounter any issues or prefer not to navigate the cancellation process yourself, Spotify’s customer support is available to assist.
How to Reach Out:
Customer Support Page: Go to the Spotify website, scroll to the bottom and click on ‘About’ where you will find ‘Contact Us.’
Choose Your Issue: Follow the prompts to specify your issue – in this case, ‘Subscription’. You will then be directed to choose how you’d like to get help, either through email, live chat, or a community forum.
Request Cancellation: Once in contact with a representative, request that your subscription be cancelled. They may ask for confirmation details such as your account information.
Things to Keep in Mind
Refunds: Spotify does not typically issue refunds for unused time unless there was an issue with billing. Check their refund policy for specifics.
Reactivation: If you decide to return to Spotify Premium, reactivating your subscription is just as easy as cancelling it.
Saved Music: Remember, once you revert to Spotify Free, you will lose access to premium features such as offline listening and ad-free music, but your playlists and saved music will remain intact.
Canceling your Spotify Premium subscription is easy if you follow the right steps. Whether you choose to navigate to their website, use the app to redirect you, or talk directly to customer support, Spotify has made the process as user-friendly as possible. Make sure you understand the terms and conditions of returning to a free account and make the decision that best suits your listening needs and budget.
In a significant development, Apple has removed popular messaging apps WhatsApp and Threads from its App Store in China in compliance with a recent government order. The move reflects ongoing tensions between Chinese authorities and global technology companies over control and data privacy.
Government Demands and Compliance
Image Source: en.sangritimes.com
The Chinese government’s request to remove these apps is part of broader efforts to regulate Internet use and maintain strict control over digital information flows within the country. Although the specific reasons for the ban have not been publicly disclosed, it is understood that concerns over data security and content management are at the heart of the decision.
Apple’s compliance with the government order highlights the delicate balance that international companies must maintain when operating in China. The tech giant has previously faced criticism for complying with government demands that conflict with its stated commitment to privacy and free expression.
Impact on Users and Market
The removal of WhatsApp and Threads from the App Store will have a direct impact on millions of users in China who rely on these platforms to communicate with peers both domestically and internationally. WhatsApp, known for its end-to-end encryption, and Threads, a new app developed by Instagram, have been popular among users seeking secure ways of communicating.
The decision to ban these apps will also have a significant impact on China’s broader technology market. This highlights the challenges foreign companies face in China’s regulatory environment, which increasingly favors domestic companies and platforms.
Response from Apple and App Developers
Apple has not released an extensive comment on the issue but confirmed that it removed the apps from its Chinese App Store in compliance with local laws. Meanwhile, representatives from Meta, the parent company of WhatsApp and Threads, expressed concern over the development, emphasizing the importance of open and secure communications platforms.
Broader Implications for Tech and Privacy
The incident is part of a larger narrative about the tension between national security concerns and individual privacy rights. China’s approach to Internet governance, which is characterized by heavy censorship and surveillance, contrasts sharply with Western norms, where freedom of expression and user privacy are more rigorously protected.
The removal of WhatsApp and Threads is likely to spark further discussion on global governance and the role of major technology firms in advocating for user rights while complying with local regulations. As digital communications become increasingly essential, the balance between government surveillance and personal privacy remains an important issue for users and companies around the world.
In conclusion, Apple’s decision to remove these apps at the behest of the Chinese government is a reminder of the complex interplay between global businesses, national policies, and user rights in the digital age. Thus, it sets a precedent that will undoubtedly influence the future operations of tech companies in China and possibly other countries with strict regulatory frameworks.
Safe Mode is a diagnostic tool integrated into many smartphones, including Samsung devices. This allows you to boot your phone with only essential system apps running, helping you identify if a third-party app is causing problems like crashes, battery drain, or slow performance. However, once you complete your diagnosis or if you accidentally enter Safe Mode, you need to know how to get out of it.
Step 1: Restart Your Phone
The simplest way to exit safe mode is to restart your device. This method resolves the issue most of the time:
Press and hold the power button on your Samsung phone until the power option comes up.
Tap on ‘Restart’ or ‘Reboot’ in the power menu.
Let the device turn off and then turn it back on. Verify if it starts normally, not in safe mode.
Step 2: Use the Notifications Panel
Samsung phones often provide a quick toggle to exit safe mode directly from the notifications panel:
You can simply swipe down from the top of your screen to open the notification panel.
Look for a notification that says ‘Safe mode is on’ or similar.
Tap on this notification, and you will usually see an option to ‘Turn off Safe mode’. Tap it, and your phone will restart in normal mode.
Step 3: Check the Volume Buttons
Sometimes, safe mode is activated because of an issue with the volume buttons. If your phone continues to boot in safe mode after a restart, inspect the volume down button:
Make sure the Volume Down button is not stuck or jammed. If it is, try gently wiggling it to free it up.
Once the button is free, restart your phone again to see if it boots normally.
Step 4: Uninstall Problematic Apps
If your Samsung phone still boots into safe mode after trying the above steps, a recently installed app might be causing the issue:
While in safe mode, navigate to Settings > Apps.
Scroll through the list of installed apps and look for any that you downloaded shortly before the problem started.
Tap on the suspicious app, then select ‘Uninstall’ to remove it from your device.
Restart your phone to see if it now boots normally.
Step 5: Factory Reset
If all other methods fail, it may be necessary to perform a factory reset as a last resort. This will erase all data from your device, so ensure you back up your files first:
Navigate to Settings, select General Management, then Reset, and choose Factory Data Reset.
Review the information on the screen, back up your data, and then tap ‘Reset’.
Proceed by following the on-screen instructions to finalize the reset process.
Exiting safe mode on Samsung phones usually involves simple steps like restarting or tapping a notification. However, persistent problems may require more thorough troubleshooting such as checking for faulty buttons or uninstalling apps. If all else fails, a factory reset should be your last course of action. Remember, the steps above may vary slightly depending on your Samsung model and software version, but they provide a general guide for 2024 models.
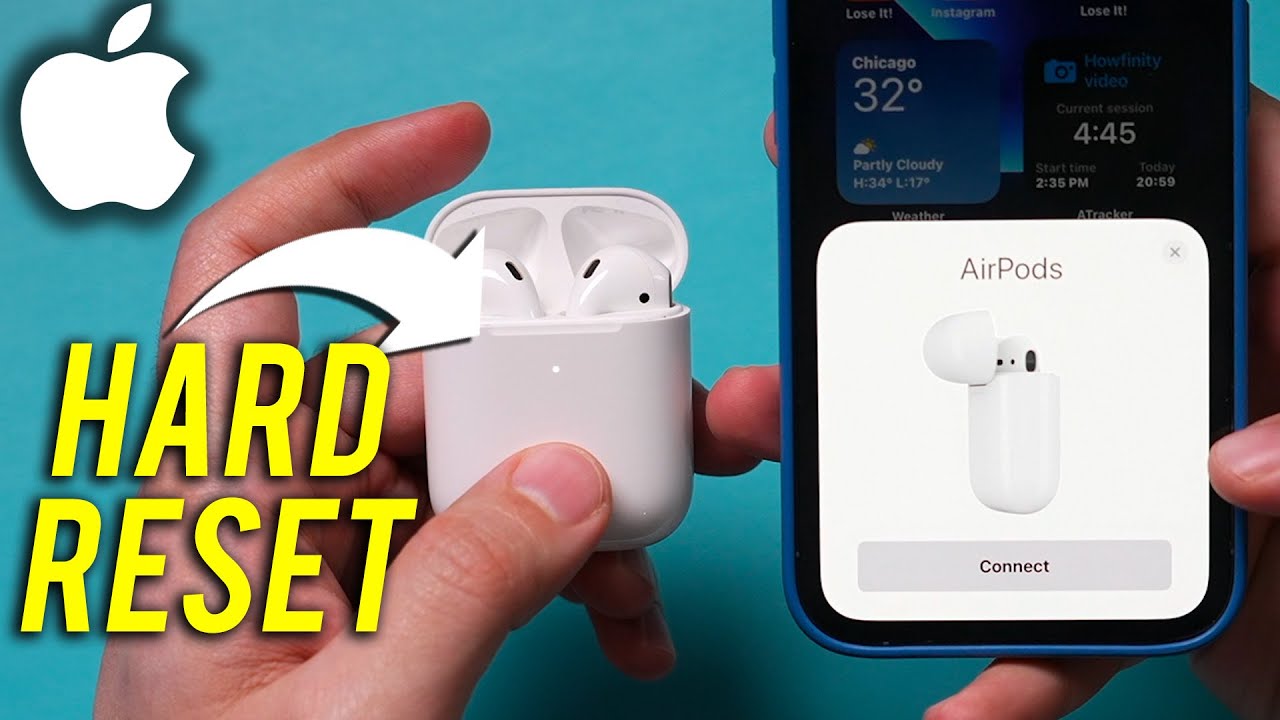
Resetting Apple AirPods is a straightforward process that can help resolve many issues like connectivity issues, battery anomalies, etc. Whether you’re troubleshooting a problem or preparing to sell your AirPods, resetting them to their factory settings is a useful step.
Understanding When to Reset Your AirPods
Resetting your AirPods should be considered when you encounter issues like:
Persistent connectivity problems with your devices.
Audio glitches, such as uneven sound delivery or intermittent dropouts.
Failure to charge properly or uneven battery levels between the AirPods.
Preparing to Reset Your AirPods
Before you initiate the reset process, ensure the following:
Your AirPods are charged sufficiently or placed in their case with the case lid open.
You have access to your paired iOS device to manage settings or to re-pair the devices afterward.
Step-by-Step Guide to Resetting Apple AirPods
Locate the Setup Button: Find the setup button on the back of your AirPods charging case.
Place AirPods in the Case: Insert both AirPods into their charging case and close the lid. Open the lid after 15 seconds.
Initiate the Reset Process: After opening the lid, press and hold the setup button for about 15 seconds, or until the status light flashes amber and then white.
Complete the Reset: Once the white light flashes, your AirPods have been successfully reset. Your AirPods are set to pair once more.
Reconnecting Your Reset AirPods
After resetting your AirPods, you will need to reconnect them to your Apple devices:
Bring the AirPods near your device and open the lid. Your iOS device should prompt a setup animation.
Adhere to the displayed guidelines to reconnect your AirPods.
Ensuring Successful Reset and Reconnection
If you face issues during the reset or reconnection process, consider these tips:
Make sure that your device’s Bluetooth function is turned on.
Verify that your iOS device is updated to the latest version to ensure compatibility and smooth functioning.
If the AirPods still don’t reconnect, repeat the reset process or consult Apple Support for further assistance.
Maintaining Your AirPods After Reset
To keep your AirPods in optimal condition:
Regularly clean your AirPods and charging case with a soft, dry, lint-free cloth.
Avoid exposing them to liquids or humid environments.
Store your AirPods in their case when not in use to maintain battery life.
Resetting your Apple AirPods can solve a variety of problems and is easy to do. By following the steps outlined above, you can ensure that your AirPods work as expected and maintain their connectivity and performance. Remember to handle your AirPods with carefully and keep them clean for the best experience.
This guide will help you manage your AirPods with confidence and enjoy seamless audio performance. Whether you’re setting up a new pair of AirPods or troubleshooting, a reset can often be the quick fix you need.


")