In the dynamic landscape of digital marketing, Meta’s Facebook Business Manager stands out as a vital tool for businesses aiming to streamline their online advertising efforts. As we move into 2024, effectively leveraging this platform can set your business apart, providing comprehensive control over your Facebook marketing and advertising activities. This guide will walk you through the essentials of using Facebook Business Manager, ensuring you’re well-equipped to optimize your online presence.
Introduction to Facebook Business Manager
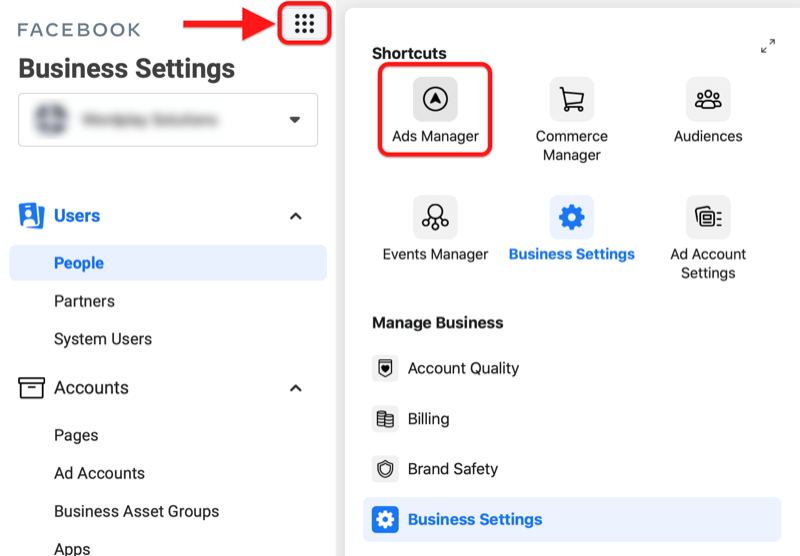
Image Source: socialmediaexaminer.com
Facebook Business Manager is a free platform by Meta, designed to centralize control over your Facebook and Instagram properties, including Pages, ad accounts, audiences, pixels, and more. This is especially useful for managing multiple assets and team members under one roof, ensuring clarity and security in your digital marketing efforts.
Setting Up Your Account
Go to the Business Manager setup page: Start by visiting the Facebook Business Manager website and select the “Create Account” option.
Enter Your Business Details: rovide your business name, your first name, and your business email address to set up your account.
Add Your Facebook Business Page: If you have an existing page, you can add it to your Business Manager account. If not, you have the option to create a new one.
Main Features of Facebook Business Manager
Managing Assets
You can add and manage various assets like Posting, Pages, ad accounts, and Instagram accounts. This centralized approach makes it easy for your team to control access and permissions.
Adding People and Assigning Roles
Business Manager allows you to add team members and assign them specific roles, from administrative to limited access, increasing security and efficiency.
Insights and Analytics
Access detailed insights and analytics about your campaigns and overall performance, enabling data-driven decisions to optimize your strategies.
Begin by identifying your marketing goals, such as increasing brand recognition, leads generation, or boosting sales. These objectives will shape the framework of your advertising campaigns.
Creating Ad Sets and Ads
For each campaign, create ad sets to target specific audiences with tailored ads. This segmentation improves campaign effectiveness.
Budgeting and Scheduling
Set your budget and schedule your ads. Facebook offers flexibility in budgeting, allowing daily or lifetime budgets and the ability to schedule ads for optimal times.
Utilizing Advanced Features
Pixel Integration
Integrate the Facebook pixel with your website to track conversions and retarget website visitors, increasing your ad accuracy.
Catalogs and Inventory Management
For e-commerce businesses, catalog access and managing inventory through Business Manager can streamline product advertising on Facebook.
Custom Audiences and Lookalike Audiences
Take advantage of custom audiences by targeting ads based on your existing contacts or website visitors. Lookalike audiences help you reach new users similar to your best customers.
Tips for Maximizing Your ROI
Best Practices for Ad Targeting: Use Facebook’s robust targeting options to reach your ideal audience based on demographics, interests, and behavior.
Creative Strategies for Advertising Content: Engage your audience with engaging advertising content that resonates with their interests and needs.
Analyzing and Optimizing Campaign Performance: Regularly review campaign analytics to understand what’s working and make adjustments for continuous improvement.
Conclusion
As we embrace advances in digital marketing in 2024, Meta’s Facebook Business Manager remains the cornerstone for businesses looking to tackle the complexities of online advertising. By mastering this tool, you can enhance your marketing strategies, get better results, and gain a competitive edge in the digital marketplace.
Google Assistant has become an integral part of the Android experience, offering users with a hands-free way to control their devices, search the Internet, and manage their daily tasks. Whether you’re new to Android or a longtime user, understanding how to effectively manage Google Assistant can increase the functionality of your device. This article guides you through the process of turning Google Assistant on and off, as well as some tips for getting the most out of it.
Understanding Google Assistant
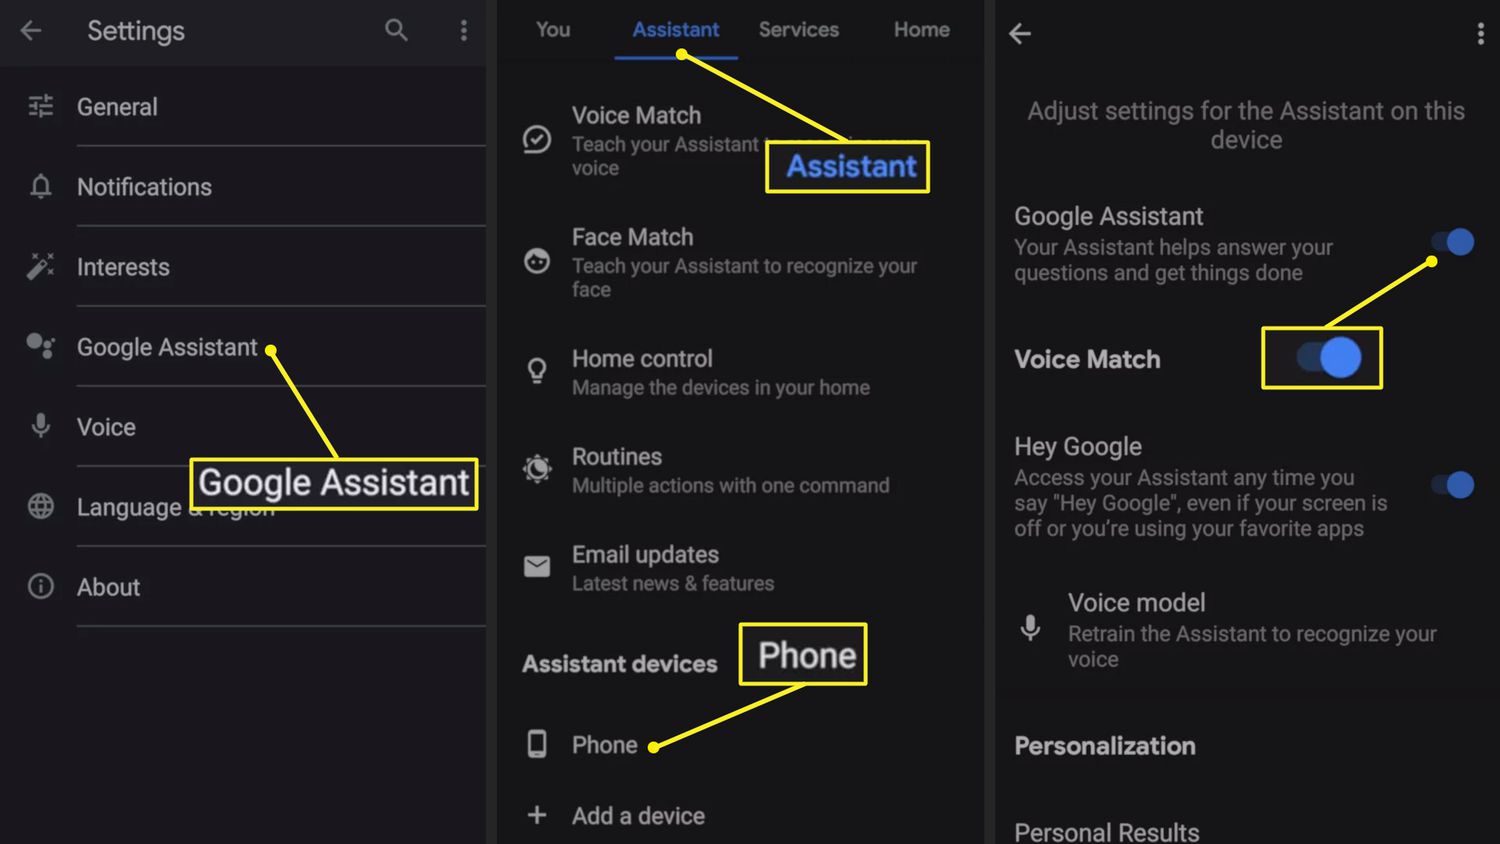
Image Source: lifewire.com
The Google Assistant is voice-activated software that provides a conversational interface to Google’s search and organizational tools. From setting reminders and sending texts to controlling smart home devices, its capabilities are vast and constantly growing.
Turning On Google Assistant
Step 1: Check Device Compatibility
Ensure your Android device is running Android 5.0 (Lollipop) or higher and has Google Play Services installed.
Step 2: Update Your Device
Go to Settings > System > Advanced > System Update to check for any available updates to ensure your device is running the latest version of its operating system.
Step 3: Open Google Assistant Settings
Long-press the Home button to activate Google Assistant or open the Google app, tap on “More” (three dots or lines) at the bottom right, go to “Settings,” and then select “Google Assistant.”
Step 4: Navigate to the ‘Assistant’ Tab
In the Google Assistant settings menu, tap on the “Assistant” tab to access various settings and preferences.
Step 5: Activate Google Assistant
Scroll down to “Assistant devices” and choose your device (e.g., Phone). Here, make sure the Google Assistant toggle is turned on.
Step 6: Set Up Voice Match (Optional)
For hands-free operation, you can set up Voice Match by finding this option in the “Assistant” tab. Follow the prompts to teach Google Assistant to recognize your voice.
Step 7: Test Google Assistant
Say “OK Google” or long-press the Home button to start using Google Assistant. Try asking a question or issuing a command to ensure it’s working correctly.
Turning Off Google Assistant
Step 1: Access Google Assistant Settings
Just like turning it on, access the Google Assistant settings by long-pressing the Home button or through the Google app.
Step 2: Go to the ‘Assistant’ Tab
Within the Google Assistant settings menu, select the “Assistant” tab to find the settings related to your devices.
Step 3: Find Your Device
Under “Assistant devices,” select your device (e.g., Phone) to access its specific settings.
Step 4: Disable Google Assistant
Toggle off the option for Google Assistant to disable it on your device. This will turn off Google Assistant’s ability to respond to voice commands or the Home button activation.
Google Assistant can significantly enhance your Android experience with its wide range of features. By following this guide, you can easily turn Google Assistant on or off depending on your preference. Experiment with its settings to customize its functionality to suit your needs.
In an unprecedented advisory, Tesla owners have been urged not to wear Apple virtual reality (VR) headsets while driving their vehicles. This cautious guidance stems from growing concerns over the potential distractions caused by these devices, which could compromise road safety.
Official Warnings to Tesla Owners
Image Source: radiojukebox.eu
Recent statements from both Tesla and safety regulators highlight the dangers of engaging with VR technology while driving. Despite Tesla’s advanced Autopilot features, the company emphasizes that the driver’s attention is paramount and that VR headsets can significantly impact this.
Tesla's Commitment to Safety
Tesla’s advice underscores its dedication to driver and passenger safety. The warning against using Apple VR headsets while driving is in line with Tesla’s ongoing efforts to reduce distractions and promote safe driving practices.
The Danger of Distraction
Using a VR headset while driving may seriously impair the driver’s ability to maintain awareness of their surroundings. This section discusses the specific risks associated with such distractions, including delayed reaction time and reduced ability to react to road hazards.
Legal Implications
The article would delve into the potential legal consequences drivers might face if found using VR headsets while driving, including fines, penalties, and increased liability in the event of an accident.
Safety Recommendations
To mitigate risks, the article suggests adhering to safety guidelines that prohibit the use of immersive technology while driving. It also proposes practical alternatives for using technology safely to enhance, rather than detract from, the driving experience.
The decision to advise Tesla owners against wearing Apple VR headsets while driving is a proactive measure aimed at maintaining high safety standards. It serves as a reminder of the importance of staying alert and focused on the road, ensuring that technology serves to support rather than hinder safe driving practices.
Generative AI is set to revolutionize our interactions with devices, making them smarter, more intuitive, and incredibly efficient. This transformative technology will significantly enhance user experience, content creation, communications, security, and device performance, while also presenting new challenges and ethical considerations.
Enhancing User Experience
Image Source: cnbc.com
Generative AI will personalize the user experience to unprecedented levels. Devices will learn from user behavior to tailor interfaces, suggestions, and services. Improving accessibility will make technology more inclusive, using AI to adapt interfaces for disabled users.
Revolutionizing Content Creation
The field of content creation will see a big change with AI. From media production, offering tools for creating music, videos, and images, to assisting with creative writing, Generative AI will democratize content creation, making it more accessible.
Transforming Communication
Communication devices will become more efficient and barrier-free. Real-time translation and smart replies, powered by AI, will make conversations in different languages seamless and increase productivity.
Advancing Security Measures
Generative AI will strengthen security measures on devices. It will enhance fraud detection and privacy protection by using pattern recognition to more effectively identify and mitigate potential threats.
Optimizing Device Performance
AI will optimize device performance, and increase battery life and processing efficiency. Devices will manage their resources more intelligently, adapting usage patterns to save energy and process tasks more efficiently.
Future of Device Interfaces
The future will see more natural interactions with devices through voice-activated controls and gesture recognition. Generative AI will make interfaces more intuitive, reduce the learning process for users, and make technology more accessible.
Ethical Considerations and Challenges
Despite its benefits, generic AI raises ethical concerns, including bias and job displacement. It is important to address these challenges, ensuring that society as a whole benefits equally from AI.
Generative AI is set to transform our devices in ways we are just beginning to understand. By enhancing user experience, revolutionizing content creation, transforming communications, advancing security, and optimizing performance, AI will make our devices more intuitive, efficient, and secure. However, it will be important to pay attention to ethical considerations to responsibly harness the full potential of AI.
In the world of wearables, the Apple Watch stands out as the pinnacle of technology, blending style with functionality. Whether you’re upgrading, troubleshooting, or just starting fresh, resetting your Apple Watch can be an important step. This guide reveals the secrets of the process, ensuring you can reset your device with confidence.
Resetting your Apple Watch isn’t just about clearing glitches. This is a step taken for a variety of reasons, from preparing the device for a new owner to refreshing its settings for a cleaner, smoother experience.
Why Reset Your Apple Watch?
Resetting can be a big relief for many common Apple Watch problems, from software issues to battery issues. This is also necessary if you are giving your watch to someone else and you need to securely erase your data.
Preparing to Reset
Backup Your Data
First things first: ensure the security of your data. Your Apple Watch automatically backs up your paired iPhone, so make sure this sync is recent enough to save your settings, messages, and health data.
Ensure WatchOS is Updated
Updating your Apple Watch to the latest version of watchOS can sometimes resolve issues without requiring a reset. Check for updates to the Apple Watch app on your iPhone.
Step-by-Step Guide to Resetting Your Apple Watch
Hard Reset
A hard reset, or force restart, does not erase any data. This is a quick fix for frozen screens or unresponsive apps.
Press and hold both side buttons for at least 10 seconds.
Release when the Apple logo coming.
Factory Reset
For a clean slate, a factory reset removes all data from your Apple Watch.
From the Apple Watch:
Go to Settings > General > Reset > Erase All Content and Settings.
Enter your passcode and confirm.
From the Paired iPhone:
Open the Apple Watch app.
Tap General > Reset > Erase Apple Watch Content and Settings.
Confirm and enter your Apple ID if prompted.
Post-Reset Steps
Restoring Data from Backup
After a factory reset, you can restore your Apple Watch from a backup during the re-pairing process with your iPhone. Select Restore from Backup and choose the latest backup.
Re-pairing with Your iPhone
Follow the on-screen instructions in the Apple Watch app on your iPhone to pair your watch again. This process also provides the option to restore from a backup.
If your Apple Watch won’t reset or can’t pair after a reset, make sure it’s charged and within range of your iPhone. Consult Apple Support for persistent problems.
Conclusion
Resetting your Apple Watch can breathe new life into your device, whether you’re troubleshooting or preparing it for a new owner. Follow these steps for a smooth transition.
In this digital age, our online presence often evolves as we explore different platforms and content creation. However, there may come a time when you decide to move away from a platform like YouTube. Deleting your YouTube channel may seem like a daunting task, but fear not; I will guide you through the process step by step. In this article, we will discuss how to delete your YouTube channel while keeping your content and subscribers in mind.
Understanding the Consequences
Before we dive into the deletion process, it is important to understand its implications. Deleting your YouTube channel is permanent, and there is no way to reverse it. You will lose all your videos, comments and other data associated with the channel. Take a moment to consider whether this is the right decision for you.
Backing Up Your Content
If you’ve decided to delete your YouTube channel, the first step is to backup your content. This ensures that you have a copy of your video and data for future reference. You can download your videos using YouTube’s built-in features or third-party tools.
Deleting the YouTube Channel
Now, let’s get started with the actual deletion process:
Open your web browser and go to YouTube.com.
Sign in to the Google account that is connected to the YouTube channel you want to delete.
Click on your profile picture in the upper right corner of the YouTube homepage.
Select “YouTube Studio” from the dropdown menu.
In YouTube Studio, click “Settings” in the left sidebar.
Go to the “Channel” section.
Click on “Advanced settings.”
Scroll to the bottom of the page and find the “Delete Channel” option.
You will be asked to enter your Google Account password for verification.
Confirm your intention to delete the channel.
Conclusion
Congratulations! You have successfully deleted your YouTube channel. Remember that this action is irreversible, so be completely sure of your decision before proceeding. If you ever want to return to YouTube, you can always create a new channel and start fresh.
Can I recover my deleted YouTube channel? No, once you delete your YouTube channel, it’s gone forever. There is no way to recover it or its contents.
Is there a waiting period before the channel is permanently deleted? Yes, there is a 30-day grace period after deletion during which you can change your mind and restore your channel.
What happens to my subscribers when I delete my channel? Your subscribers will no longer be able to access your content, and will not be notified of the deletion.
Do I lose my YouTube earnings when I delete my channel? Yes, any unpaid earnings will be confiscated, and you will not receive any future payments. Make sure you have withdrawn your earnings before deleting your channel.
Can I delete my YouTube channel on the mobile app? The deletion process is easy to navigate on a computer. It is recommended to use a web browser for this task.