Your Tech Story

tips and hacks

How To Delete Your YouTube Channel: Step-by-Step Guide

How To Delete Your YouTube Channel: Step-by-Step Guide

In this digital age, our online presence often evolves as we explore different platforms and content creation. However, there may come a time when you decide to move away from a platform like YouTube. Deleting your YouTube channel may seem like a daunting task, but fear not; I will guide you through the process step by step. In this article, we will discuss how to delete your YouTube channel while keeping your content and subscribers in mind.

Understanding the Consequences

How To Delete Your YouTube Channel: Step-by-Step Guide

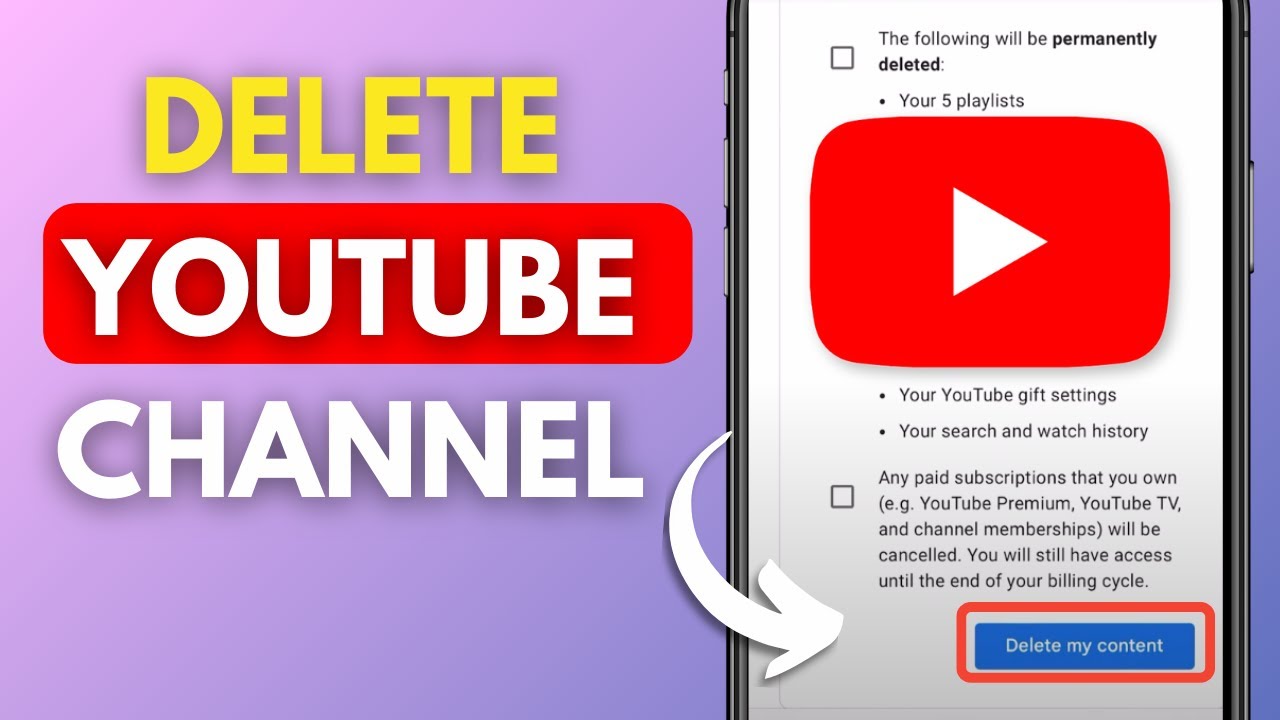
Before we dive into the deletion process, it is important to understand its implications. Deleting your YouTube channel is permanent, and there is no way to reverse it. You will lose all your videos, comments and other data associated with the channel. Take a moment to consider whether this is the right decision for you.

Backing Up Your Content

If you’ve decided to delete your YouTube channel, the first step is to backup your content. This ensures that you have a copy of your video and data for future reference. You can download your videos using YouTube’s built-in features or third-party tools.

Deleting the YouTube Channel

Now, let’s get started with the actual deletion process:

  • Open your web browser and go to YouTube.com.

  • Sign in to the Google account that is connected to the YouTube channel you want to delete.

  • Click on your profile picture in the upper right corner of the YouTube homepage.

  • Select “YouTube Studio” from the dropdown menu.

  • In YouTube Studio, click “Settings” in the left sidebar.

  • Go to the “Channel” section.

  • Click on “Advanced settings.”

  • Scroll to the bottom of the page and find the “Delete Channel” option.

  • You will be asked to enter your Google Account password for verification.

  • Confirm your intention to delete the channel.

Conclusion

Congratulations! You have successfully deleted your YouTube channel. Remember that this action is irreversible, so be completely sure of your decision before proceeding. If you ever want to return to YouTube, you can always create a new channel and start fresh.

FAQs

  1. Can I recover my deleted YouTube channel? No, once you delete your YouTube channel, it’s gone forever. There is no way to recover it or its contents.

  2. Is there a waiting period before the channel is permanently deleted? Yes, there is a 30-day grace period after deletion during which you can change your mind and restore your channel.

  3. What happens to my subscribers when I delete my channel? Your subscribers will no longer be able to access your content, and will not be notified of the deletion.

  4. Do I lose my YouTube earnings when I delete my channel? Yes, any unpaid earnings will be confiscated, and you will not receive any future payments. Make sure you have withdrawn your earnings before deleting your channel.

  5. Can I delete my YouTube channel on the mobile app? The deletion process is easy to navigate on a computer. It is recommended to use a web browser for this task.

How to Fix Offline HP Printer: Step-by-Step Guide

How to Fix Offline HP Printer: Step-by-Step Guide

Dealing with an HP printer that consistently shows an ‘offline’ status and requires frequent reboots can be a significant hindrance to your productivity and workflow. This common issue, often rooted in connectivity or software glitches, can disrupt your daily printing tasks. Whether you’re facing problems with physical connections, network settings, outdated drivers, or system errors, there are several troubleshooting steps you can undertake. This guide aims to provide clear, practical solutions to bring your HP printer back online and reduce the need for constant reboots. From checking cables and connections to updating drivers and adjusting settings, we’ll explore various methods to resolve this frustrating issue and ensure your printer operates smoothly, enhancing your overall printing experience.

Understanding the 'Offline' Status

When your printer status shows ‘offline,’ it’s not communicating with your computer. This could be due to several reasons, such as connection issues or outdated drivers.

Initial Checks and Quick Fixes

How to Fix Offline HP Printer: Step-by-Step Guide

Image Source: issuu.com

Start with basic troubleshooting: check if the printer is on, ensure it’s set as the default printer, and try a preliminary reboot of both your printer and computer.

Checking Printer Connections

Make sure all physical connections (USB or Ethernet) are secure. If you’re using a wireless printer, verify your Wi-Fi connection and printer’s network settings.

Updating Printer Drivers

Outdated or corrupt drivers can cause connectivity problems. Visit HP’s website to download and install the latest drivers for your printer model.

Configuring Printer Settings in Windows

On your PC, navigate to ‘Devices and Printers’ and ensure your HP printer is set as the default. Also, check the printer queue for stuck print jobs.

Dealing with Network Issues

Network inconsistencies can cause your printer to go offline. Restart your router and reconnect your printer to the network.

Restarting the Print Spooler Service

On Windows, the print spooler service can be restarted by going to ‘Services.msc,’ locating ‘Print Spooler,’ and clicking ‘Restart.’

Setting as Default Printer

Ensuring your HP printer is set as the default printer in your computer’s settings can often resolve the offline issue.

Using HP Print and Scan Doctor

HP provides a free tool, HP Print and Scan Doctor, which can diagnose and resolve printing and scanning problems.

Factory Resetting Your Printer

As a last resort, perform a factory reset of your printer. This can clear any errors causing the offline status but will erase all settings.

Conclusion

By following these steps, you can often resolve the issue of an HP printer frequently going offline, ensuring seamless printing.

FAQs

  1. Why does my HP printer keep going to offline?

    • Various reasons like connection issues, outdated drivers, or incorrect settings can cause this.

  2. How can I reset my HP printer?

    • Most HP printers have a reset option in the settings menu; refer to your printer’s manual for specific instructions.

  3. Is HP Print and Scan Doctor free to use?

    • Yes, it’s a free tool provided by HP for diagnosing and fixing printer issues.

  4. What should I do if my printer doesn’t show up in my computer’s printer list?

    • Check connections, restart your printer and computer, and reinstall the printer if necessary.

  5. Can network issues cause my printer to go offline?

    • Yes, poor network connectivity can result in your printer showing an offline status.

Laptop Plugged In But Not Charging: Step-by-Step Guide to Troubleshooting and Fixes

Laptop Plugged In But Not Charging: Step-by-Step Guide to Troubleshooting and Fixes

Imagine you’re preparing for an important day of work or study, but notice that your laptop refuses to charge. This common puzzle may be a source of frustration, but fear not! In this comprehensive guide, we will walk you through various solutions to directly deal with the “plugged-in, not charging” issue.

Identifying the Problem

Laptop Plugged In But Not Charging: Step-by-Step Guide to Troubleshooting and Fixes

First, let’s recognize the signs. Is your laptop indicating that it is plugged in but no battery percentage is increasing? Does it refuse to accept the power source altogether? Recognizing these symptoms is the first step in troubleshooting.

Checking the Power Source

Make sure your power outlet is working. Try plugging in another device to confirm. It is also wise to check your home for any tripped circuit breakers or blown fuses.

Examining the AC Adapter

Inspect your laptop’s AC adapter. Note any physical damage such as broken wires or loose connections. If possible, test the adapter with another compatible laptop to see if the issue persists.

Inspecting the Laptop Charging Port

Check your laptop’s charging port for debris or damage. Gently cleaning the port with a dry, soft-bristled brush can remove dust that may be obstructing the connection.

Battery Health Check

Assess the health of your laptop’s battery. Many laptops have built-in diagnostics for this. If your battery has passed its lifecycle (usually around 500 full charge cycles), it may be time to replace it.

Updating Software and Drivers

Outdated software and drivers can sometimes cause charging issues. Make sure your laptop’s operating system and BIOS are up to date. Check the company’s website for the latest driver updates.

Resetting the System

Performing a power reset can often resolve charging issues. Turn off your laptop, unplug all peripherals, press and hold the power button for 15-20 seconds, then reconnect and try charging again.

Seeking Professional Help

If the problem remains the same, it’s time to consult a professional. Look for authorized service centers or trusted technicians who specialize in laptop repair.

Debunking Charging Myths

Let’s bust some myths. For example, leaving your laptop plugged in all the time doesn’t harm the battery, thanks to modern battery management systems.

Laptop Warranty and Support

If your laptop is still under warranty, you may be eligible for a free repair or replacement. Contact Customer Support for assistance.

Conclusion

Remember, charging problems are not the end of your laptop. With these tips and solutions, you can effectively troubleshoot the problem and extend the life of your device.

How to Add Your Videos and Photos to Google Maps Places in 4 Easy Ways

How to Add Your Videos and Photos to Google Maps Places in 4 Easy Ways

With the option to include photos and videos in place of textual recommendations, improving your Google Maps ratings has even more effect. This gives your opinion more prominence and offers helpful visual information about places. These are the best 4 methods for quickly and easily adding images or videos to any Google Maps location.

Through the Android Google Maps app

How to Add Your Videos and Photos to Google Maps Places in 4 Easy Ways
  • Open the Google Maps application on your Android gadget.
  • Look for the place you wish to add media to.
  • Slider will come up once you tap on the location.
  • After that, select “Post a photo update.”
  • Choose the preferred images or videos.
  • In the upper right corner of the screen, select the “Post” option.

Using Google Maps on a computer

  • Launch your browser, then go to https://www.google.com/maps.
  • Look for the place you want to improve.
  • After swiping down, select “Add a photo.”
  • Select an image from Google Photos or send one from your computer.
  • After selecting the desired image, click “Select.”

Using the Android Google Photos App

  • Open the Photos application on your Android mobile device.
  • Open the image you wish to connect to a certain place.
  • Press “Share.”
  • Click on “Add to Maps.”
  • In the upper part of the screen, tap “Select a place”.
  • Select “Somewhere else?” and type the name of the location.

Using the iPhone Google Maps App

  • Launch the iPhone app Google Maps.
  • Look for where you want to go.
  • Open the location’s page when it has been chosen.
  • After swiping down, select “Add a photo update.”
  • Choose a photo from the gallery on your iPhone.
  • In the upper right corner, click the “Post” button.

Conclusion

Recall that all of your contributions—including media and reviews—are linked to your profile and are available to everyone. Viewers of the Google Maps app may access profiles under the ‘Contributor’ section. Make sure your photographs are no more than 5MB, and your films should not exceed 75MB. This allows you to submit HD videos at a quality of 720p.

By using these easy steps, you can improve your ratings and provide useful visual material to Google Maps, which will improve the user experience for people all across the world.

How to Mirror Your iPhone Screen on a Computer?

How to Mirror Your iPhone Screen on a Computer?

Mirroring your iPhone screen to a computer lets you display your phone’s content on a larger screen, which is ideal for presentations, streaming media or gaming. This can be achieved wirelessly using AirPlay with the Apple TV or through various third-party applications that are compatible with both Mac and Windows Pcs. This feature enhances the usefulness of your iPhone by offering a larger display and interactive capabilities, making it a valuable device for both personal and business use.

Why Mirror Your iPhone?

Screen mirroring offers many benefits, including an enhanced viewing experience, easy content sharing, and impressive display capabilities.

Method 1: Using AirPlay with Apple TV

How to Mirror Your iPhone Screen on a Computer?

Image Source: letsview.com

If you have an Apple TV, you can use AirPlay to mirror your iPhone screen wirelessly. Make sure both devices are on the same Wi-Fi network, swipe down to access Control Center on your iPhone, tap “Screen Mirroring” and select your Apple TV.

Method 2: Mirroring via Third-Party Apps

Many third-party apps like Reflector and AirServer allow you to mirror your iPhone to a computer. These apps work by creating a connection on the same Wi-Fi network.

Method 3: Connecting with a Lightning Cable

For a more stable connection, use a Lightning cable to connect your iPhone directly to your computer. This method is particularly effective for avoiding lag or connection problems.

Method 4: Utilizing QuickTime on Mac

Mac users can use QuickTime Player for screen mirroring. Connect your iPhone to your Mac, open QuickTime Player, select ‘File’, then ‘New Movie Recording’, and select your iPhone as the camera source.

Screen Mirroring for Windows Users

Windows users can mirror their iPhone screen using third-party applications like ApowerMirror or LonelyScreen, which emulate an AirPlay receiver on a PC.

Troubleshooting Common Mirroring Issues

Common issues include connectivity problems and lag. Restarting the device, checking the Wi-Fi connection, and updating the software may resolve these issues.

Enhancing Your Mirroring Experience

For the best experience, ensure a strong Wi-Fi connection, consider using a wired connection for stability, and close unnecessary background apps.

Security Considerations in Screen Mirroring

Be conscious of privacy and security. Avoid mirroring sensitive information in public areas and ensure a secure Wi-Fi network when mirroring.

Creative Uses of Screen Mirroring

Screen mirroring can be used for gaming, watching videos, group presentations, and more, providing a versatile tool for both personal and business use.

Conclusion

Mirroring your iPhone screen to a computer is a simple yet powerful tool. Whether for work or play, these methods provide flexibility and enhance your digital experience.

How to Delete Voicemail in iPhone (2024)

How to Delete Voicemail in iPhone (2024)

In 2024, managing voicemails on your iPhone remains an essential aspect of digital communication. With voicemails often containing important messages, it’s crucial to know how to delete them effectively, both to manage storage and maintain privacy. Here’s a comprehensive guide on how to delete voicemails on an iPhone.

Understanding iPhone's Voicemail System

The iPhone’s voicemail system is an integral part of its communications features, storing audio messages for when you miss a call.

Way 1: Deleting Voicemails Directly from the Voicemail Tab

You can easily delete individual voicemails in the Voicemail tab.

  • Go to the Phone app

  • Swiping left on voicemail

  • Tap “Delete”.

Way 2: Using the Phone App to Delete Multiple Voicemails

  • Go to the Phone app

  • Tap “Edit”

  • Select voicemail

  • And then tap “Delete”.

Way 3: Clearing Voicemails from the Recycle Bin

Voicemails are not completely deleted until they are removed from the “Recycle Bin” folder.

    • Go to the Phone app

    • Click on the Voicemail tab

    • Scroll to the bottom of the page and click on “Deleted Messages”

    • Click on the “Clear All” option

    • Confirm your selection in the popup box.

Tips for Effective Voicemail Management

How to Delete Voicemail in iPhone (2024)

Image Source: zdnet.com

Effective voicemail management is essential to maintain clear and efficient communication. Key tips include regularly reviewing and deleting old messages to avoid a full inbox, using organizational features to categorize and prioritize important voicemails, and setting clear greetings to guide callers.

Troubleshooting Common Voicemail Issues

Troubleshooting common voicemail issues usually involves a few important steps to ensure smooth functioning. First, check your network connection, as connectivity issues often hinder voicemail services. If voicemails are not being received, verify your voicemail settings and make sure the service is set up correctly. Resetting your voicemail password may resolve access issues. For technical glitches, restarting your phone can often resolve minor software issues.

Conclusion

In conclusion, deleting voicemail on iPhone in 2024 is a straightforward process that can significantly increase the efficiency and organization of your device. Be it deleting individual messages, bulk deletion, or clearing your ‘Deleted Messages’ folder, each method plays an important role in managing your voicemails effectively. By following these simple steps and tips, you can ensure that your iPhone’s voicemail remains organized, up-to-date, and free of unnecessary clutter, leading to a more streamlined and productive communication experience.