In 2024, managing voicemails on your iPhone remains an essential aspect of digital communication. With voicemails often containing important messages, it’s crucial to know how to delete them effectively, both to manage storage and maintain privacy. Here’s a comprehensive guide on how to delete voicemails on an iPhone.
Understanding iPhone's Voicemail System
The iPhone’s voicemail system is an integral part of its communications features, storing audio messages for when you miss a call.
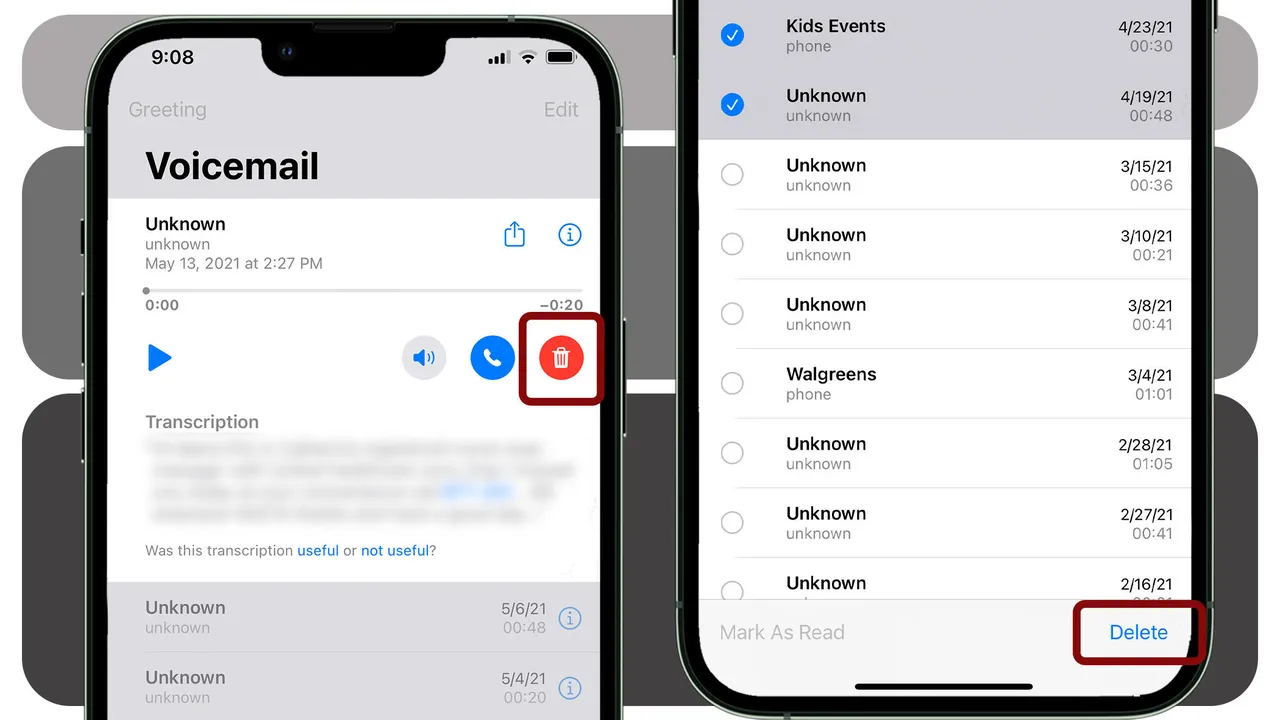
Way 1: Deleting Voicemails Directly from the Voicemail Tab
You can easily delete individual voicemails in the Voicemail tab.
Go to the Phone app
Swiping left on voicemail
Tap “Delete”.
Way 2: Using the Phone App to Delete Multiple Voicemails
Go to the Phone app
Tap “Edit”
Select voicemail
And then tap “Delete”.
Way 3: Clearing Voicemails from the Recycle Bin
Voicemails are not completely deleted until they are removed from the “Recycle Bin” folder.
Go to the Phone app
Click on the Voicemail tab
Scroll to the bottom of the page and click on “Deleted Messages”
Click on the “Clear All” option
Confirm your selection in the popup box.
Tips for Effective Voicemail Management
Image Source: zdnet.com
Effective voicemail management is essential to maintain clear and efficient communication. Key tips include regularly reviewing and deleting old messages to avoid a full inbox, using organizational features to categorize and prioritize important voicemails, and setting clear greetings to guide callers.
Troubleshooting Common Voicemail Issues
Troubleshooting common voicemail issues usually involves a few important steps to ensure smooth functioning. First, check your network connection, as connectivity issues often hinder voicemail services. If voicemails are not being received, verify your voicemail settings and make sure the service is set up correctly. Resetting your voicemail password may resolve access issues. For technical glitches, restarting your phone can often resolve minor software issues.
In conclusion, deleting voicemail on iPhone in 2024 is a straightforward process that can significantly increase the efficiency and organization of your device. Be it deleting individual messages, bulk deletion, or clearing your ‘Deleted Messages’ folder, each method plays an important role in managing your voicemails effectively. By following these simple steps and tips, you can ensure that your iPhone’s voicemail remains organized, up-to-date, and free of unnecessary clutter, leading to a more streamlined and productive communication experience.
Experiencing an ‘offline’ status on your printer can be frustrating, especially when you need to print urgently. This article explains effective tricks to reconnect your printer to Wi-Fi and get it back online.
Understanding Printer Offline Status
Image Source: pcmag.com
When your printer is offline, it is not able to communicate with your computer over a Wi-Fi network. This could be due to a variety of reasons ranging from network issues to outdated software.
Check Your Wi-Fi Connection
The first step is to ensure your Wi-Fi network is active and stable. Check other devices to confirm network functionality.
Restart Your Printer and Router
Often, simply restarting your printer and Wi-Fi router can resolve connectivity issues. This resets the network settings and may help you reconnect your printer.
Update Printer Drivers
Outdated printer drivers can prevent your printer from connecting to Wi-Fi. Updating these drivers can often resolve this issue.
Reconfigure the Wi-Fi Settings on the Printer
Sometimes, it is necessary to reconfigure your printer’s Wi-Fi settings. This involves resetting the network settings on your printer and connecting it to your Wi-Fi network again.
Check for IP Address Conflicts
Your printer may be offline due to an IP address conflict in your network. Resolving these conflicts can restore connectivity.
Use Static IP Address for Printer
Assigning a static IP address to your printer ensures it consistently connects to the same network address, improving stability.
Disable VPN Services Temporarily
Active VPN services may interfere with printer connectivity. Disabling them temporarily may help establish a stable connection.
Check Printer's Firmware
Outdated firmware can also cause connectivity issues. Update the firmware and install them if available.
Consider Using a Wired Connection
If Wi-Fi connectivity issues persist, consider using a wired connection for reliable printing.
When to Seek Professional Help
If these steps do not resolve the problem, it is time to seek professional technical support.
Starting a YouTube channel for vlogging can be an exciting venture. Be it a hobby or a career path, these tips will guide you in creating a successful and professional vlogging channel.
Defining Your Niche
Identify what you’re passionate about and what you can consistently create content on. A specific niche helps attract a dedicated audience
Understanding Your Audience
Know who your target audience is. It is important to understand their interests and preferences to create relevant and engaging content.
Creating High-Quality Content
Quality is important in vlogging. Focus on creating clear, entertaining, and informative content that adds value to your audience.
Investing in the Right Equipment
Image Source: amberscript.com
Although you don’t need high-end gear to start with, investing in a good camera, microphone, and lighting setup can significantly improve video quality.
Mastering Video Editing
Learning basic video editing skills can greatly improve your content. Use editing software to add effects, music, and graphics to your video.
Optimizing for SEO
Use relevant keywords, catchy titles, and descriptions to make your videos more discoverable on YouTube.
Building an Online Presence
Promote your channel on social media platforms and join online communities. This helps in building a wider audience base.
Engaging with Your Audience
Respond to comments, solicit feedback, and engage your audience in your content. Engagement increases audience loyalty and channel growth.
Consistency and Scheduling
Maintain a consistent posting schedule. Regular video uploads keep your audience engaged and also attract new viewers.
Monetizing Your Channel
Once your channel meets YouTube’s eligibility criteria, explore different monetization options like ads, sponsorships, and merchandise.
Analyzing Performance Metrics
Use YouTube Analytics to analyze metrics like views, watch time, and subscriber growth to refine your strategy.
Collaborating with Other YouTubers
Collaboration can bring your channel to a wider audience. Partner with other YouTubers to create joint content.
Apple’s Journal App in iOS 17 is a game-changer for anyone looking to document their thoughts, ideas, and daily experiences. This comprehensive guide will introduce you to the app’s intuitive interface, showing you how to create, personalize, and organize your journal entries. Learn to enhance your writing with advanced text features, add multimedia for a richer experience, and integrate seamlessly with other iOS apps. Whether you’re documenting memories, tracking goals, or seeking a mindful escape, the Journal App in iOS 17 is your perfect companion, blending functionality with creativity for an enriching journaling journey.
Navigating the Interface
Familiarize yourself with the user-friendly interface, which includes key features such as entry lists, search functions, and settings.
Creating Your First Journal Entry
Image Source: tomsguide.com
Let’s create your first entry. I’ll guide you through a simple process to start your journaling journey. Discover how to effortlessly input your thoughts, emotions, or daily experiences, customizing each entry with text styles, colors, and multimedia enhancements. Whether you’re chronicling a special moment, jotting down ideas, or simply recording your day, Apple’s Journal App makes it intuitive and enjoyable, setting the stage for a rich, personalized journaling experience on your iOS device.
Utilizing Advanced Text Features
Apple’s Journal app goes beyond basic journaling with its range of advanced text features, allowing you to create entries that are as unique as your experiences. Dive deeper into a variety of text customization options, including diverse fonts, styles, and colors to creatively express your ideas and stories.
Adding Media to Your Entries
This feature allows you to bring your stories to life with vivid visuals and sounds. Whether it’s a memorable photo, an inspirational video clip, or a piece of audio that captures the essence of your day, embedding media in your journal entries enriches your storytelling, making each page not only It becomes a record of your life, but also a living tapestry of memories.
Using Tags and Categories
Learn to efficiently organize your entries using tags and categories for easy retrieval and reference.
Integrating with Other iOS Apps
Maximize your journaling experience by syncing your entries with other iOS apps like Calendar and Reminders.
Customizing Your Journal Experience
Customize your journal with theme, font, and layout options to match your personal style.
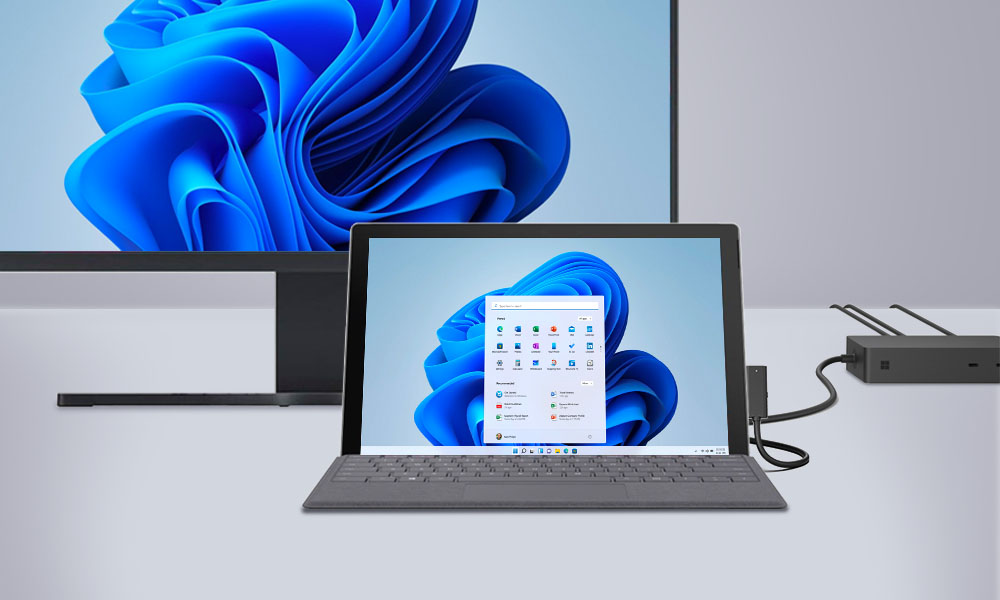
Connecting the Surface Pro to a monitor is a straightforward process that significantly expands your visual workspace. Whether for increased productivity, better multitasking, or better entertainment experiences, connecting your Surface Pro to an external monitor is a game-changer. This simple but impressive process involves identifying the correct port on your device (such as USB-C or Mini DisplayPort), selecting a compatible monitor, and using the appropriate cable or adapter. Once connected, you can easily adjust display settings like resolution and orientation to suit your needs. Ideal for professionals, creative people, and tech enthusiasts, this setup unlocks the full potential of your Surface Pro, turning it into a more powerful and versatile workstation.
Understanding Surface Pro Ports
Understanding the ports on your Surface Pro is key to maximizing its functionality, especially when it comes to connecting external devices like a monitor. Here’s a description of the common ports you’ll find on the various Surface Pro models.
Choosing the Right Monitor
Image Source: gechic.com
Not all monitors are created equal. When selecting a monitor for your Surface Pro, it’s important to consider a variety of factors to ensure you get the most out of your dual-screen setup. Consider size, resolution, and port compatibility.
Types of Cables and Adapters
You’ll probably need a cable or adapter to connect. We’ll explore HDMI, DisplayPort, and USB-C options.
Configuring Display Settings on Windows
Once you’ve successfully connected your Surface Pro to a monitor, the next step is to fine-tune your display settings to ensure an optimal viewing experience. Here’s how to adjust key settings like resolution, orientation, and others.
Benefits of a Dual Monitor Setup
Discover the transformative power of a dual monitor setup! Embrace the vastness of extended screen space that not only doubles your digital workspace but also boosts your productivity. Whether for professional work, creative projects, or even to enhance your entertainment experience, learn why upgrading to two monitors could be a game-changer in your daily digital life.
Customizing Your Workspace
Organize your digital workspace effectively. Here’s how to manage Windows and apps on multiple screens.
Surface Pro Docking Station: Expanding Your Options
For even more connectivity, consider using the Surface Pro Docking Station.
Wireless Display Options
Prefer to go wireless? We’ll discuss Miracast and other wireless display methods.
The Surface Pro shines in professional environments, offering a seamless blend of portability, power, and versatility. Its lightweight design and robust performance make it an ideal choice for business professionals on the go. With features like a high-resolution touchscreen, detachable keyboard, and stylus support, it easily adapts to different work scenarios. The compatibility of the Surface Pro turns it into a desktop-like experience when needed.
Conclusion
Extending your Surface Pro’s display to a monitor opens up a world of possibilities. Whether for work or play, this is a simple but effective upgrade.
In a significant cyber security breach, renowned gold retailer Kitco experienced massive disruption to its online services. The company, known for its precious metals trading and live market updates, confirmed that its website suffered a cyberattack, causing temporary operational failures and accessibility issues for its global customer base.
Image Source: bnnbloomberg.ca
The exact nature of the cyber attack has not been disclosed, but initial reports suggest a sophisticated intrusion, possibly aimed at compromising customer data and disrupting online trading services. Kitco’s rapid response to the incident included immediate measures to secure their systems and assess the extent of the breach.
Impact on Customers and Operations
The disruption caused concern among Kitco customers, who rely on the platform for real-time gold market analysis and trading. While the full impact on customer data and transactions is still being evaluated, Kitco assures its customers that protecting their information and restoring normal operations is their top priority.
Expert Opinions on Cyber Security
Cybersecurity experts call the incident a reminder of the vulnerabilities faced by online retailers, especially in high-value sectors like precious metals. The increasing trend of cyber attacks in the retail sector underlines the need for advanced security measures and robust cyber defense systems.
Kitco’s management has announced that they are working closely with cybersecurity experts to resolve the issue and prevent future attacks. He has also urged customers to remain alert and follow the company’s updates for safe transactions.
As the investigation continues, this incident raises important questions about the preparedness of online retailers against increasingly sophisticated cyber threats. Kitco’s experience serves as an important case study in the importance of proactive cybersecurity strategies in the digital age.
The company has promised to provide regular updates as more information becomes available and is committed to fully restoring its services and strengthening its security infrastructure to protect against future cyber threats.